
How to Use Multiple Monitors with RDP Access
Step by step guide to using all of your computer monitors during a Remote Desktop session, spreading the server desktop across several screens at the same time.
Before you start, you will need:
✅ A computer running Windows Pro, Enterprise or Education
✅ Two or more monitors connected and detected by Windows
✅ The IP address and port of your server (sent by e-mail after activation)
✅ The username and password for your Windows access (sent by e-mail)
Open Remote Desktop Connection
Press Windows + R, type mstsc and press Enter.
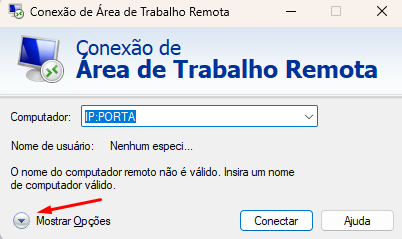
mstsc › EnterIn the window that opens, enter the IP address and port of your server in the Computer field, using the format 192.168.1.100:port.
Then click Show Options in the lower left corner of the window.
Go to the "Display" tab
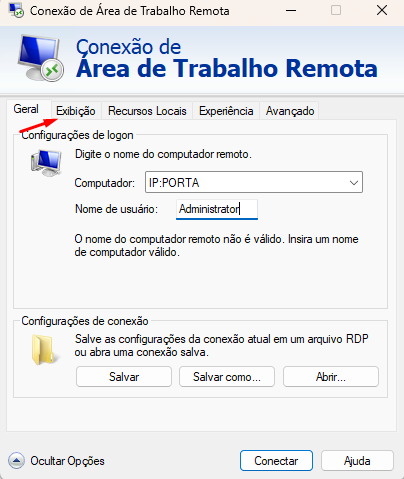
With the options expanded, fill in the User name field with Administrator (or the username provided in your activation e-mail).
Then click the Display tab, the second one in the list, right next to "General".
Enable the use of all monitors
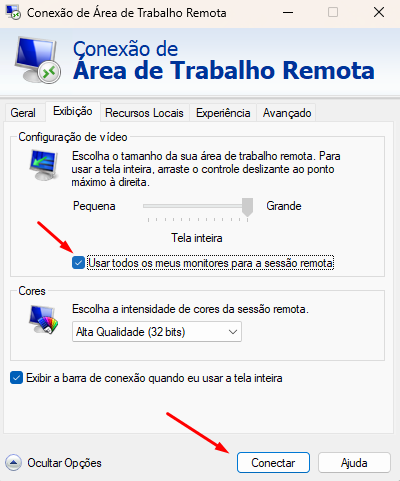
Inside the Display tab, find the checkbox "Use all my monitors for the remote session" and tick that option.
Once that is done, click Connect.
Enter your password when prompted and the session will open across all of your screens.
Save the configuration for future connections
To avoid repeating the process every time, go back to the General tab before connecting and click Save As....
Choose a location on your computer and give the file a name, for example My VPS.rdp. Next time, just double click that file and the connection will open with multiple monitors already enabled.
Windows + R › mstsc /multimon › opens directly in multi monitor modeUsing only some of your monitors (optional)
If you have three or more monitors and want to use only part of them in the remote session, open the .rdp file you saved with Notepad and add the following lines:
selectedmonitors:s:0,1
To find out which number corresponds to each monitor, run mstsc /l from Windows + R. A window will show the list of available monitors along with their identifiers.
Save the file and open it again. The session will now use only the monitors you specified.
Useful shortcuts during the session
| Shortcut | What it does |
|---|---|
| Ctrl + Alt + Break | Switches between full screen and windowed mode |
| Ctrl + Alt + End | Same as Ctrl + Alt + Del inside the remote session |
| Connection bar | Sits at the top of your primary monitor and lets you minimise or end the session |
Troubleshooting
Make sure the option "Use all my monitors for the remote session" was ticked before you clicked Connect. If you are using a previously saved .rdp file, you will need to edit it and save it again with the option enabled.
This happens when the session is using "span" mode instead of true multi monitor mode. Check that your .rdp file contains use multimon:i:1 and not span monitors:i:1.
This feature is available on the Pro, Enterprise and Education editions of Windows. On the Home edition the RDP client works normally, but it is limited to a single monitor.
The larger the screen area, the higher the bandwidth usage. In the Display tab, lower the Colors setting to 16 bit and, in the Experience tab, select a slower connection speed to disable visual effects.
Check that all monitors are set to "Extend" on your local Windows, under Settings → System → Display. The "Duplicate" mode makes RDP see only one screen.
RDP works normally in this situation, but the visual result is better when your monitors share the same resolution and the same orientation.
Need help? Open a ticket with our Support Center.